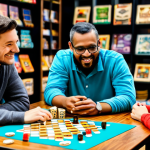
There’s something truly magical about bringing a board game to life, isn’t there? For me, it’s not just about rolling dice or strategizing; it’s about the tactile experience, the way a perfectly painted miniature can transform a simple tabletop into an epic battlefield or a sprawling dungeon.
I still remember the first time I carefully unboxed a set of unpainted minis, feeling that mix of excitement and mild intimidation. The journey from a dull gray plastic to a vibrant, characterful piece is immensely rewarding, a personal touch that elevates every game night.
With the explosion of 3D printing technology, especially in high-detail resin, the possibilities for customization are now truly boundless. Gone are the days of relying solely on factory paint jobs; now, anyone can craft bespoke armies or unique heroes, making each game session uniquely yours.
It’s an artistic expression, a passion project, and a fantastic way to deepen your immersion in the games you love. This trend of personalized miniature creation isn’t just about aesthetics; it’s about making your gaming experience truly unforgettable.
Let’s explore this fascinating world in detail below.
Diving into the World of Bespoke Board Game Miniatures

There’s nothing quite like the feeling of holding a miniature you’ve brought to life with your own hands. It transforms a simple piece of plastic into a character with a story, a vibrant part of your game world.
I still remember the first time I carefully applied a wash and saw the details on a miniature pop, or the thrill of getting a perfect highlight. It felt like unlocking a secret level of immersion, a truly personal touch that factory-painted minis just can’t replicate.
This journey from a dull, unpainted model to a vibrant, personalized masterpiece is incredibly rewarding, and it starts with understanding the basics.
Whether you’re a seasoned artist or someone who’s never held a brush, the accessibility of tools and techniques today means anyone can jump in. It’s not just about painting; it’s about choosing the right miniature, preparing it, and then applying a whole spectrum of creative techniques.
My own initial attempts were… humble, to say the least, but every brush stroke was a step towards mastering a craft that now brings me immense joy every time I set up a game.
1. Starting Your Miniature Painting Adventure: Beyond the Basics
Embarking on this hobby can seem daunting at first, especially when you see the incredible work others produce. But honestly, it’s about taking that first step, one brush stroke at a time.
When I first got into it, I thought I needed an expensive airbrush right away, but I quickly learned that patience and a few good brushes are far more valuable.
My go-to advice for anyone starting out is to focus on foundational skills before getting lost in advanced techniques. Think about prepping your miniatures—cleaning mold lines is crucial, and it makes a huge difference in the final look.
I’ve seen so many beginners skip this, and it always shows. Priming is another non-negotiable step; it gives the paint something to adhere to, ensuring a smooth, even coat.
I personally prefer a good rattle can primer for speed, but a brush-on primer works wonders too, especially if you’re working indoors. Don’t be afraid to make mistakes; that’s where the real learning happens.
Every wobbly line or accidental blob teaches you something new about brush control or paint consistency.
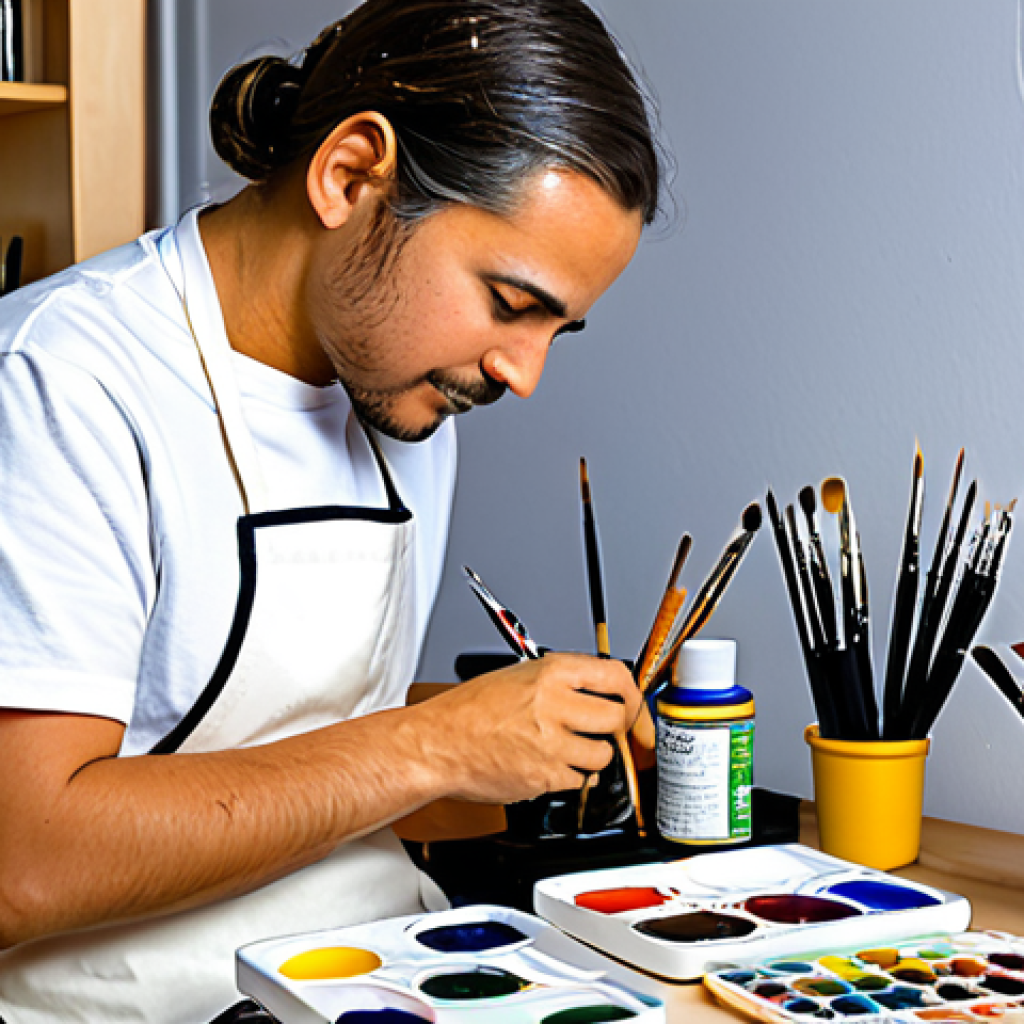
2. Essential Toolkit for the Aspiring Miniaturist
Building your toolkit is an exciting part of the journey, but it doesn’t have to break the bank. My first set of paints came from a starter kit, and honestly, they lasted me ages.
You really only need a handful of core colors to start: a primary set (red, blue, yellow), black, white, and a metallic or two. Brushes are where I’d suggest a bit more investment; a good fine-tip brush for details, a larger one for base coating, and an old beat-up one for drybrushing will serve you well.
I found that a size 2 brush is my workhorse for almost everything. Beyond paints and brushes, you’ll want a hobby knife for mold lines, some super glue for assembly, and a palette – a ceramic tile or even an old plastic lid works perfectly.
Don’t forget a couple of water pots for rinsing your brushes; I use two, one for the initial rinse and one for a cleaner rinse, it really helps keep your paints pure.
I also swear by a good headlamp or magnifying lamp; my eyes aren’t what they used to be, and seeing those tiny details clearly makes all the difference.
| Tool Category | Essential Items | My Personal Tip / Experience |
|---|---|---|
| Paints | Acrylic miniatures paints (starter set), basic primary colors, black, white, metallics | Start with a reputable brand like Citadel, Vallejo, or Army Painter. Their starter sets offer a good range. Don’t thin them too much initially; learn consistency. |
| Brushes | Size 2 brush, fine-tip detail brush, larger flat brush, old brush for drybrushing | Invest in one good quality synthetic or sable brush (e.g., Winsor & Newton Series 7) for fine details. Clean brushes immediately after use. |
| Prep & Assembly | Hobby knife, plastic clippers, super glue, green stuff (or other gap filler) | Always clean mold lines! It’s tedious but makes a huge difference. Use ventilation when gluing. |
| Palette | Wet palette (recommended), ceramic tile, plastic lid | A wet palette is a game-changer for keeping paints workable longer, especially for blending. Seriously, it’s a must-have! |
| Lighting & Magnification | Desk lamp (daylight bulb), magnifying lamp or hobby glasses | Good lighting reduces eye strain and helps you see intricate details clearly. It’s probably the most underrated tool. |
Mastering the Art: Advanced Techniques for Stunning Results
Once you’re comfortable with the basics of base coating and washing, a whole new world of techniques opens up. This is where I truly felt my miniatures started coming to life, moving beyond just “painted” to “art.” The first advanced technique I tried to really master was layering, building up thin coats of progressively lighter colors to create smooth transitions and define volume.
It’s painstaking work, believe me, I’ve spent hours on a single cape trying to get the blend just right, but the results are incredibly rewarding. It gives your miniatures a depth that drybrushing alone can’t achieve.
Then there’s glazing, which is like super-thin layering, used to tint areas or smooth out harsh transitions. I remember trying to glaze a dragon’s scales for the first time, barely seeing the color change, but then stepping back and realizing how much richer the tone had become.
It’s all about patience and thin coats, something I still remind myself of almost daily.
1. Bringing Miniatures to Life: Blending and Highlighting
Blending is arguably one of the most impactful techniques for making your miniatures look professional. It’s not just about slapping on a color; it’s about making colors flow seamlessly into one another, creating realistic shadows and highlights.
* Wet Blending: This technique involves mixing two wet paints directly on the miniature’s surface. It’s tricky to master, but when done right, it produces incredibly smooth transitions.
My first successful attempt at wet blending on a large flat surface, like a hero’s shield, felt like a true breakthrough. It takes practice to get the paint consistency right—not too thick, not too thin—and to work quickly before the paint dries.
* Feathering: Similar to layering but with shorter, finer strokes. It’s excellent for creating subtle textures or for blending within a small area. I often use feathering for blending transitions on fabric or skin where I want a very soft look without distinct lines.
* Edge Highlighting: This is a fantastic way to make details pop. By carefully painting a thin, light line along the sharp edges of your miniature, you create contrast that makes details stand out.
I love how edge highlighting makes armor plates look incredibly sharp and defined. It’s one of those techniques that immediately elevates the overall look of a mini, even if the rest of the painting is relatively simple.
2. Adding Character and Realism: Weathering and Basing
Beyond the figure itself, the base and any weathering effects can truly tell a story. * Weathering Effects: This is where you add battle damage, rust, dirt, or grime to your miniatures.
It adds a layer of realism and narrative depth. I often experiment with various weathering powders to create dust or mud effects on boots and cloaks. Learning to apply chipped paint effects with a sponge or fine brush can make a piece of armor look like it’s been through countless battles.
It’s about making the mini look lived-in, not pristine from the factory. * Basing: A good base grounds your miniature in its environment and adds context.
You can use texture paints, static grass, sand, rocks, or even small resin effects to create anything from a barren wasteland to a lush forest floor. I find basing to be a really fun and relaxing part of the process, a chance to get creative with miniature landscapes.
My favorite technique is using cork for rocky outcroppings, it’s incredibly versatile and easy to work with. A well-executed base can transform an already well-painted miniature into a true display piece, making it feel like it’s stepping right out of its world and onto your tabletop.
Troubleshooting Common Miniature Painting Woes
Every painter, no matter how experienced, runs into problems. Trust me, I’ve had my fair share of frustrating moments, from paints drying too fast to brushes splaying out mid-stroke.
It’s all part of the learning curve, and honestly, figuring out how to fix things makes you a better painter. One of the most common issues I hear about, and certainly experienced myself, is “chunky” paint.
This usually means your paint is too thick, or you’re applying too many layers without proper thinning. My first attempts at painting were plagued by this, and my miniatures looked like they were covered in melted crayons!
The key, as I learned through painful trial and error, is thinning your paints with a little water or a medium until they have the consistency of milk.
It might feel counterintuitive to apply such thin layers, but that’s how you get those smooth, professional-looking finishes.
1. Battling Paint Consistency and Brush Control
Achieving the right paint consistency is a constant dance. It’s a skill you develop over time, like learning to ride a bike—it feels awkward at first, then suddenly clicks.
* Over-Thinning vs. Under-Thinning: If your paint is too thin, it’ll behave like a wash and won’t cover properly, leading to chalky finishes. If it’s too thick, it will obscure details and leave brush strokes.
My personal trick is to dip my brush in water, then wick most of it off on a paper towel before mixing it with the paint on my palette. This gives me a lot of control.
It’s an acquired feel, but you’ll get there! * Brush Control Woes: Wobbly lines, painting outside the lines, or getting paint where you don’t want it are super common.
This often comes down to how you hold your brush and stabilize your hands. I always rest my wrists or forearms on the table, and often use my non-painting hand to brace my painting hand.
It gives you a much steadier platform, especially for fine details. Breathe out as you make a stroke; it helps calm your hand. Trust me, I still do this for those tiny eyes!
2. Dealing with Primer Issues and Dull Finishes
Primer is the foundation, and if it’s off, everything else suffers. And who wants a dull-looking miniature after all that effort? * Grainy or Dusty Primer: This usually happens if you spray primer in humid conditions, or if the can is too far from the miniature.
I made this mistake early on, and my minis felt like sandpaper. Always check the humidity levels and spray from the recommended distance (usually 8-12 inches).
If it happens, sometimes a light sanding or a quick brush-on varnish can smooth it out, but sometimes, sadly, stripping and re-priming is the only way.
* Lack of Pop/Dullness: If your painted miniatures look dull or flat, it could be a few things. Sometimes it’s the lack of contrast between shadows and highlights.
More often, it’s about the finish. A good matte varnish will protect your paint job and unify the finish. If you want specific areas to shine, like gems or armor, a gloss varnish over those spots works wonders.
I always apply a protective varnish layer; it saves so much heartache if the mini gets handled a lot during games.
Protecting Your Masterpieces: Display and Storage Solutions
After spending hours, days, or even weeks meticulously painting a miniature, the last thing you want is for it to get damaged. I learned this the hard way when a favorite piece took an unfortunate tumble from a shelf.
It was heartbreaking! Proper display and storage aren’t just about keeping dust off; they’re about preserving your hard work and ensuring your miniatures stay pristine for years of gaming and admiring.
For display, I’ve found clear acrylic display cases to be fantastic. They protect against dust and curious fingers (especially those of younger family members!), while still allowing your miniatures to be admired.
Plus, they can make even a small collection look like a museum exhibit.
1. Displaying Your Art with Pride
Your miniatures are more than just game pieces; they’re works of art, and they deserve to be shown off. * Showcasing Your Collection: Beyond acrylic cases, consider dedicated display shelves with good lighting.
I’ve seen some incredible setups using LED strips that truly make the colors pop. If you’re like me and have limited space, rotating which miniatures are on display keeps things fresh.
I often arrange them by faction or game, creating little thematic dioramas that bring an extra layer of enjoyment. * Environmental Considerations: Sunlight can fade paints over time, especially vibrant blues and reds.
Keep your display areas out of direct sunlight. Humidity can also be an issue, leading to paint peeling or warping in extreme cases. Maintaining a stable room temperature and humidity level is ideal, though not always practical.
For particularly valuable pieces, a sealed display case with a desiccant pack might be overkill, but it’s an option!
2. Secure Storage for Travel and Protection
When miniatures aren’t on display, or when you need to transport them, secure storage is absolutely crucial. * Foam Trays and Cases: These are the industry standard for a reason.
Custom-cut foam trays, or pluck foam trays that you can customize yourself, provide a snug fit for each miniature, preventing them from jostling around and breaking.
I’ve invested in a few good foam cases over the years, and they’ve saved countless hours of repair work. They’re worth every penny, especially if you take your armies to game nights or tournaments.
* Magnetic Storage: For miniatures with magnetic bases (which you can easily add yourself by gluing small rare-earth magnets to the bottom), metal toolboxes or plastic containers with metal sheets glued to the bottom are fantastic.
The magnets hold the miniatures firmly in place, preventing any movement. I love this method for my larger, more fragile models as it means no pressure on delicate parts from foam.
It’s a bit more effort upfront, but the security it provides is unparalleled.
The Community Canvas: Sharing Your Creations
One of the most rewarding aspects of miniature painting, for me, isn’t just the act of painting itself, but sharing my finished pieces with others. The miniature painting community is incredibly vibrant and supportive, a place where you can get feedback, inspiration, and truly feel part of something bigger.
I remember when I first dared to post a picture of one of my painted minis online; I was so nervous! But the encouraging comments and constructive criticism I received really pushed me to improve and experiment.
It’s not just about showcasing your best work; it’s about the journey, the struggles, and the triumphs. This shared passion creates a fantastic environment for growth and connection.
1. Finding Your Tribe: Online and Local Communities
Connecting with other painters has been a game-changer for my hobby. It keeps me motivated and constantly learning. * Online Platforms: Websites like Instagram, Reddit (especially subreddits like r/minipainting, r/warhammer), Facebook groups, and dedicated forums are goldmines of inspiration and advice.
I spend way too much time browsing these, marveling at the talent out there and picking up new tips. Posting your own work and asking for feedback is invaluable for improving your skills.
Don’t be shy; everyone started somewhere! * Local Gaming Stores and Clubs: Many local game stores host painting nights or have active communities. This is where the magic really happens for me.
Meeting people in person, sharing techniques, and even painting together is an incredibly rich experience. I’ve made some fantastic friends through my local painting group, and there’s nothing quite like sharing a pot of coffee and talking about brush strokes with like-minded enthusiasts.
2. Giving and Receiving Feedback: Growing as an Artist
Feedback, both positive and constructive, is crucial for development. It helps you see your work through fresh eyes. * Constructive Criticism: It can be hard to hear that your beloved miniature has a flaw, but embrace it!
I always ask for specific feedback rather than just “is this good?” Asking “How can I improve my blending on this cloak?” or “What do you think about the skin tone?” yields much more helpful responses.
Remember, everyone wants to see you succeed. * Sharing Your Knowledge: Once you’ve gained some experience, pay it forward! Helping newer painters, sharing your tips, or even just offering encouragement is incredibly fulfilling.
I love seeing beginners make those big leaps, and knowing I might have played a small part in that is a great feeling. It reinforces your own knowledge and builds a stronger community for everyone.
Monetizing Your Passion: Beyond the Tabletop
While miniature painting is undoubtedly a passion-driven hobby, it’s also possible to turn that passion into a side hustle, or even a full-time career for some.
I’ve always been intrigued by how some painters manage to monetize their incredible talent, and I’ve dabbled in a few avenues myself. It’s not just about selling painted miniatures; there are various ways your skills can generate income, from commissions to teaching.
It’s about leveraging your expertise and sharing your unique artistic vision with a wider audience who appreciates the value of bespoke, hand-painted models.
1. Commission Painting: Turning Skill into Income
Commission painting is perhaps the most direct way to monetize your painting skills. People are often willing to pay a premium for beautifully painted miniatures, especially if they lack the time, skill, or desire to paint themselves.
* Setting Up Your Service: This involves building a portfolio of your best work, setting clear pricing structures, and establishing communication channels.
My advice is to start small, perhaps with a few pieces for friends or through local gaming groups, to build confidence and refine your process. It’s crucial to be transparent about your skill level and delivery times.
I learned early on that under-promising and over-delivering is key to happy clients. * Pricing Your Work: This can be one of the trickiest parts. You need to consider the complexity of the model, the level of detail requested (e.g., tabletop ready, display quality), the time it takes you, and your hourly rate.
Don’t undervalue your time and skill! Research what other commission painters charge for similar quality. My own pricing strategy usually involves a base rate per model, plus an additional cost for complex details like freehand designs or extensive basing.
2. Content Creation and Beyond: Expanding Your Reach
The digital age offers fantastic opportunities to share your passion and generate income beyond direct commissions. * Tutorials and Live Streams: If you enjoy teaching, creating video tutorials on YouTube or streaming your painting process on platforms like Twitch can attract a loyal following.
Monetization comes through ads, sponsorships, and viewer donations. I’ve learned so much from watching others paint live, picking up little tips and tricks that I wouldn’t have found elsewhere.
It’s a great way to build a personal brand. * Selling Your Own Creations or Services: This could range from selling unique, limited-edition painted miniatures directly, to offering custom basing services, or even creating and selling your own resin miniature designs if you get into 3D sculpting.
Some artists even sell digital paint guides or ebooks. The possibilities are truly endless, limited only by your creativity and willingness to put yourself out there.
It’s an exciting time to be a miniature artist, with so many avenues to explore.
Wrapping Up Your Miniature Painting Journey
As we’ve journeyed through the world of miniature painting, I hope you’ve felt the same excitement and passion that fuels my own adventures with a brush. It’s a hobby that offers endless opportunities for creativity, a chance to truly bring tiny worlds to life with your own hands. Remember, every master was once a beginner, and the most important thing is to enjoy the process, learn from your experiments, and celebrate every small victory. The joy of seeing a dull piece of plastic transform into a character brimming with personality is a reward in itself, and it’s a feeling that never gets old.
Handy Tips for Miniaturists
1. Embrace Imperfection: Don’t let the pursuit of perfection stop you from painting. Every “mistake” is a valuable lesson, and some of the most characterful miniatures come from happy accidents.
2. Stay Hydrated (Your Paint, That Is!): Always remember to thin your paints to a milky consistency. This is probably the single most impactful tip for getting smooth, professional-looking results.
3. Clean Your Brushes religiously: A well-cared-for brush is a happy brush. Cleaning them immediately after use will prolong their life and maintain their precision, saving you money and frustration in the long run.
4. Take Breaks: Miniature painting can be intense. Step away for a few minutes if you feel frustrated or fatigued. Fresh eyes often spot solutions or new ideas you wouldn’t see when bogged down.
5. Connect and Share: The miniature painting community is incredibly welcoming. Share your work, ask questions, and learn from others. It’s a fantastic way to stay motivated and discover new techniques.
Key Takeaways
Miniature painting is an accessible and incredibly rewarding hobby focused on personal expression and creative growth. Success hinges on starting with essential tools, understanding fundamental techniques like thinning paints and brush control, and continually experimenting with advanced methods like blending and weathering. Protecting your finished pieces through proper display and storage ensures their longevity. Finally, engaging with the vibrant global community and exploring monetization avenues like commissions or content creation can further enrich your journey, transforming a passion into a fulfilling artistic and even entrepreneurial endeavor.
Frequently Asked Questions (FAQ) 📖
Q: I’m completely new to this whole miniature painting thing, and while the idea of making my games unique is super appealing, it honestly looks a bit daunting! Where does a complete beginner even start without feeling totally overwhelmed?
A: Oh, I totally get that feeling! I still vividly remember staring at my first unpainted minis, feeling a weird mix of excitement and “Oh goodness, what have I gotten myself into?” Honestly, the best way to start is small and simple.
Don’t go out and buy every fancy brush and paint set right away. Grab a basic starter paint kit – lots of brands offer them with a few essential colors, a brush or two, and maybe even a beginner mini.
Pick one mini, just one, and focus on it. Watch a couple of simple YouTube tutorials (there are tons of amazing creators out there who break it down for absolute novices).
Don’t aim for perfection; aim for “better than gray plastic.” My first few minis were, let’s just say, “rustic,” but that feeling of accomplishment when you see your paint on your mini is just incredible.
It’s a journey, not a race, and every brush stroke is part of learning. Just jump in!
Q: The mention of 3D printing for custom miniatures really piqued my interest. Is this something that’s genuinely accessible to the average hobbyist these days, or is it still a super specialized, expensive setup only for hardcore enthusiasts?
A: That’s a fantastic question, and one I hear a lot! It’s wild how much things have changed in just a few years. When I first started hearing about people 3D printing their own minis, it felt like something out of a sci-fi movie, way beyond my budget or tech skills.
But honestly, consumer-grade resin 3D printers have become incredibly accessible – both in terms of price and ease of use. You can pick up a decent entry-level resin printer for a few hundred bucks now, which is a far cry from the thousands they used to cost.
Setting them up is pretty straightforward, and the online communities are super helpful if you hit a snag. The real game-changer is the sheer volume of amazing sculptors out there creating digital files (STLs) that you can buy or even get through Patreon subscriptions.
It’s like having an infinite miniature store at your fingertips. Yes, there’s a small learning curve, but the freedom to print exactly what you want, when you want it, for a fraction of the cost of buying pre-made, is just phenomenal.
It truly puts bespoke armies and unique characters within reach of pretty much anyone who’s willing to learn a little.
Q: Beyond just making my game pieces look cool, what’s the real benefit of putting in all this effort? Does it truly change the game experience, or is it just a niche artistic pursuit for people who enjoy painting?
A: Oh, it’s so much more than just aesthetics, trust me! While the visual appeal is definitely a huge part of it – who doesn’t love seeing a beautifully painted dragon on the table?
– the true magic happens on a deeper level. When you’ve invested your time and creativity into painting a miniature, it’s no longer just a piece of plastic; it’s your piece of plastic.
It carries a bit of your story, your effort, your artistic expression. This personal connection dramatically deepens your immersion in the game. That hero you spent hours on?
They’re not just a character sheet and a generic token; they’re a vivid, tangible presence on the board. For me, it transforms game night from a casual play session into an epic event.
Friends gather around, admiring the detail, sometimes even asking about the specific colors or techniques you used. It sparks conversation, creates shared memories, and genuinely elevates the entire atmosphere.
It’s like the difference between watching a movie on a small TV versus seeing it in an IMAX theater – the experience is just richer, more vibrant, and undeniably more unforgettable.
It’s a passion project, yes, but one that directly enhances the fun and connection we seek in our favorite tabletop adventures.
📚 References
Wikipedia Encyclopedia
구글 검색 결과
구글 검색 결과
구글 검색 결과
구글 검색 결과
구글 검색 결과